Adding a GPU node to a K3s cluster
Published on 2025/10/23
Introduction
A GPU-enabled host is commonly used by Data Scientists to design and test their deep learning models and in the end to train them. As GPU resources are costly, Kubernetes is often leveraged to enable their sharing among a community of users, along with access means to the corresponding workloads.
In the perspective of self-hosting such a solution, or simply to better understand off-the-shelf solutions, this article is a guide through existing documentation and provides instructions to set up the environment. It also explains the role of the various components involved both during the setup and at run-time, and how they interact.
While NVIDIA specific information is used, the content remains as general as possible.
Things are changing rapidly in this domain and this article could become partly outdated more quickly than others.
Read the docs
The documentation maze
It's a shame that billion-dollars companies sometimes provide documentation so poorly organized. Many open source projects wouldn't survive if they behaved like that. And indeed the first recommendation to find our way in the documentation is to rely on Kubernetes generic information rather than our GPU vendor's one.
So we can start by reading the Kubernetes's documentation page Schedule GPUs | Kubernetes, which is a perfect entry point, and which by the way provides us a pointer to a NVIDIA useful document (NVIDIA Device Plugin for Kubernetes), yet not the main one we will use.
As far as NVIDIA is concerned, we will later have to deal with the vendor's entry point: NVIDIA Cloud Native Technologies, and mainly under the "Kubernetes and NVIDIA GPUs" tab, the following references:
- NVIDIA GPU Operator
- NVIDIA GPU Feature Discovery
- NVIDIA Device Plugin for Kubernetes, already mentioned above
also important under the "Containers and NVIDIA GPUs" tab:
- NVIDIA Container Toolkit, under which
- Architecture overview
but they shouldn't be recommended to get started, as we don't understand at first how those components rely to each other.
Now we know how to find information, let's get knowledge about the different components required.
Scheduling GPUs with Kubernetes
Our goal is to integrate a node equipped with one or several GPU devices in a Kubernetes cluster, and to run data science related workloads on it. Linux containers enable to expose the GPU Linux device to a container running on the same host, so the code running in such a container can use the GPUs, as a native OS process would.

Now we know this is technically feasible, we also want:
- to configure the containers when they start to have access to the devices
- to monitor the GPU devices state
- to control how other pods can be scheduled or not on the same node, as we often want the GPU workload to run as efficiently as possible once scheduled
Enabling pods to access the GPU
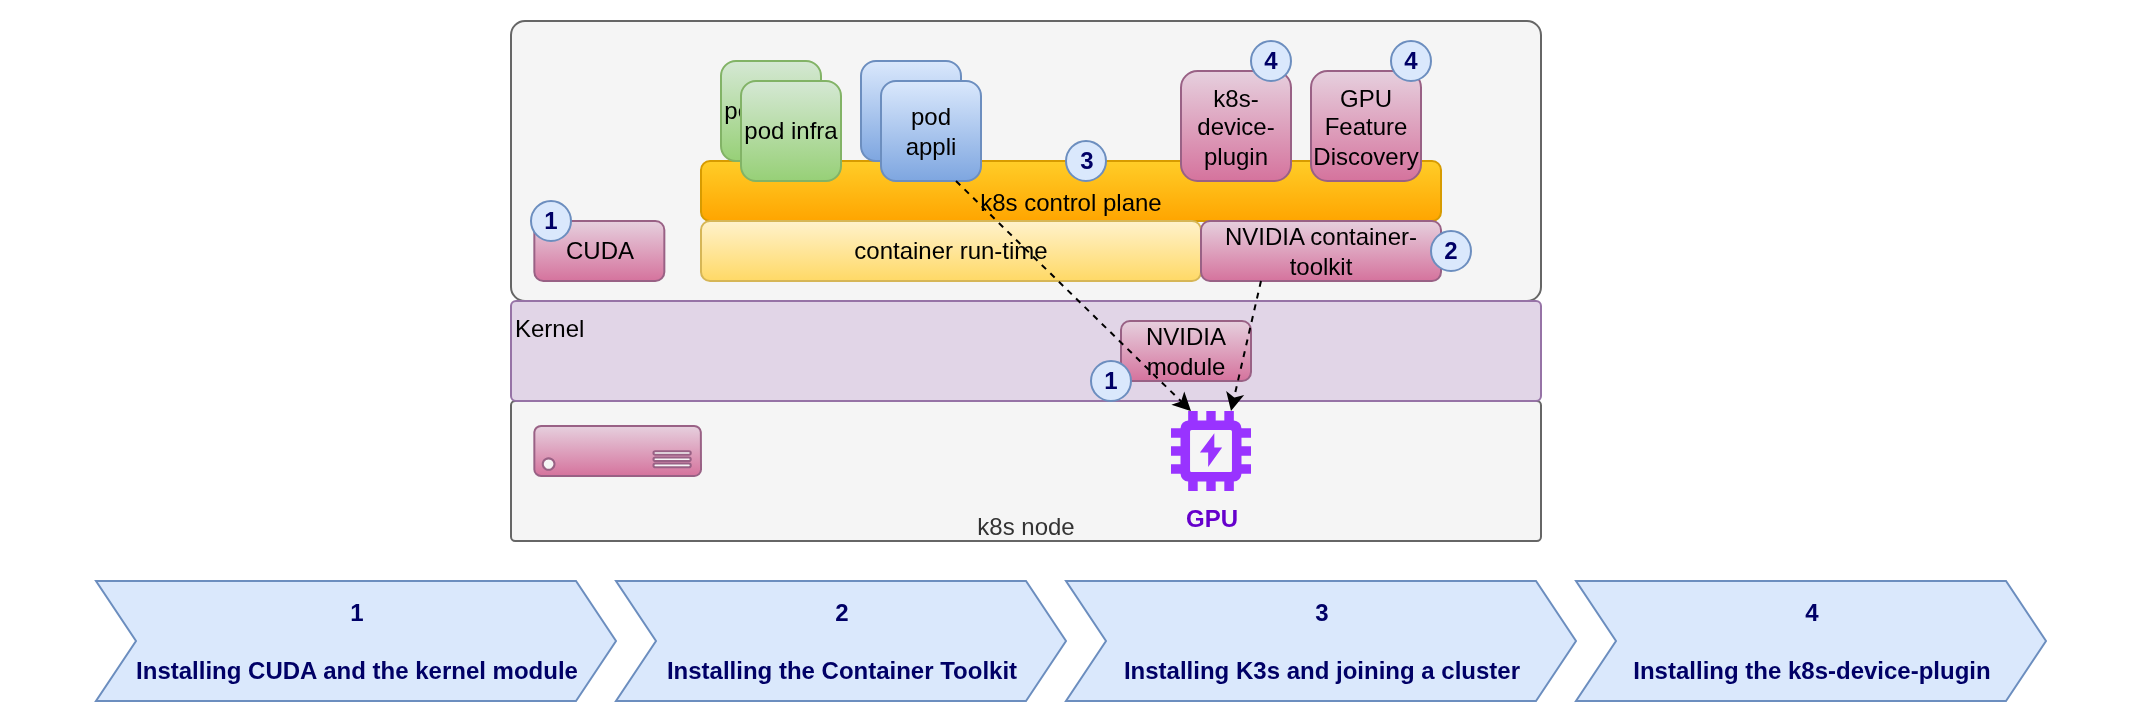
The devices and containers configuration is a responsibility shared between the container runtime and Kubernetes infrastructure components. This is summarized on the schema below:

Without giving all the technical details:
- The container runtime is wrapped with the vendor's specific
component
NVIDIA container-toolkitto configure the GPU and the container at container initialization time, see the detailed architecture here; - the Kubernetes device plugin
is a component that informs the Kubernetes control plane about the node's GPU status: number, health, hardware characteristics,
with a vendor's specific implementation
NVIDIA k8s-device-plugin, implemented in that case as a daemonset.
Scheduling pods on GPU nodes
There are several features available with Kubernetes to control pod scheduling on specific nodes. The most straightforward one is based on taints and tolerations: a taint marks a given node as forbidding scheduling or even execution of any pod but one that has the corresponding toleration. Thus a node marked with a kind of GPU taint will only run pods that need this kind of GPU by providing the corresponding toleration. For instance:
kubectl taint nodes node-with-gpu "acme.com/gpu=true:NoSchedule"
containers:
- name: workload-needing-gpu
  image: "registry/ds-python-gpu:1.0"
#...
tolerations:
- key: "acme.com/gpu"
  operator: Exists
  effect: "NoSchedule"
Even if we use other features to control GPU scheduling, corresponding taints are generally required to avoid the presence of application workloads that don't need GPU.
Another scheduling feature simple to use relies on resources requests. For instance a container can request most of the CPU and RAM available on a node to ensure no other container will be scheduled on the same node. In the case of GPUs, Kubernetes exposes vendor-specific resources after the device plugin has been installed. For instance (only limits are needed and meaningful in that case):
containers:
- name: workload-needing-gpu
  image: "registry/ds-python-gpu:1.0"
  resources:
    limits:
      acme.com/gpu: 1
Node Feature Discovery
Kubernetes also defines a service as an add-on: Node Feature Discovery whose purpose is to automatically add labels on nodes based on the hardware they integrate. In the case of NVIDIA for instance we can find here the labels that are set when the NVIDIA GPU Feature Discovery is deployed. The service is supposed to enable adding taints to the nodes, but it likely is not implemented (or documented?) in the case of NVIDIA. That's unfortunate, it would be a useful feature.
Such labels can then be leveraged to fine-tune GPU workloads scheduling according to specific hardware requirements.
GPU support software installation
This section is vendor specific, NVIDIA in that case. The recommended way to install NVIDIA GPU support in Kubernetes is to use the NVIDIA GPU Operator, which has the ability to install the GPU driver and the Container Toolkit along the way. However, as the goal here is to get a better understanding of the underlying interactions, the choice is made to play the steps one by one.
Also, cloud-providers often provide GPU pre-installed images for VMs, not always based on the Linux distribution we want. Here the examples are based on Debian 12 (old stable) as Debian 13 is not yet supported by the vendor.
The steps illustrated below are detailed in the following sections:

Installing CUDA and the kernel module
CUDA is the NVIDIA framework that contains the libraries to access the GPU through its dedicated Kernel module. Installation instructions are provided here in the case of Debian 12. For instance:
export DEBIAN_FRONTEND=noninteractive
cd /tmp && \
wget https://developer.download.nvidia.com/compute/cuda/repos/debian12/x86_64/cuda-keyring_1.1-1_all.deb && \
dpkg -i cuda-keyring_1.1-1_all.deb && \
rm cuda-keyring_1.1-1_all.deb && \
apt-get update && \
apt-get install -y linux-headers-`uname -r` && \
apt-get install -y software-properties-common && \
add-apt-repository -y contrib && \
apt-get install -y cuda-toolkit-13-0 && \
apt-get install -y nvidia-driver-cuda nvidia-kernel-dkms
It is required to restart the system at that point, not the most pleasant thing to do if using cloud-init initiated automation.
We can check the Kernel's module presence:
lsmod | grep nvidia
nvidia_modeset       1630208  1
nvidia              104009728  6 nvidia_modeset
nvidia_drm             16384  0
and then run some sanity check:
sudo apt install -y git cmake

export PATH=${PATH}:/usr/local/cuda-13.0/bin
export LD_LIBRARY_PATH=${LD_LIBRARY_PATH}:/usr/local/cuda-13.0/lib64
git clone https://github.com/NVIDIA/cuda-samples.git
cd cuda-samples
mkdir build && cd build
cmake ..
make -j$(nproc)

./Samples/1_Utilities/deviceQuery/deviceQuery Starting...

 CUDA Device Query (Runtime API) version (CUDART static linking)

Detected 1 CUDA Capable device(s)

Device 0: "Quadro RTX 5000"
  CUDA Driver Version / Runtime Version          13.0 / 13.0
  CUDA Capability Major/Minor version number:    7.5
  Total amount of global memory:                 14910 MBytes (15634726912 bytes)
  (048) Multiprocessors, (064) CUDA Cores/MP:    3072 CUDA Cores
  GPU Max Clock rate:                            1815 MHz (1.81 GHz)
...
deviceQuery, CUDA Driver = CUDART, CUDA Driver Version = 13.0, CUDA Runtime Version = 13.0, NumDevs = 1
Result = PASS
Then let's move forward with the installation.
Installing the Container Toolkit
Instructions are provided here, for instance:
export DEBIAN_FRONTEND=noninteractive
export NVIDIA_CONTAINER_TOOLKIT_VERSION=1.17.8-1
cd /tmp && \
wget https://nvidia.github.io/libnvidia-container/gpgkey && \
rm -f /usr/share/keyrings/nvidia-container-toolkit-keyring.gpg && \
gpg --dearmor -o /usr/share/keyrings/nvidia-container-toolkit-keyring.gpg < gpgkey && \
rm gpgkey && \
wget https://nvidia.github.io/libnvidia-container/stable/deb/nvidia-container-toolkit.list && \
sed 's#deb https://#deb [signed-by=/usr/share/keyrings/nvidia-container-toolkit-keyring.gpg] https://#g' \
  < nvidia-container-toolkit.list \
  > /etc/apt/sources.list.d/nvidia-container-toolkit.list && \
rm nvidia-container-toolkit.list && \
apt-get update && \
apt-get install -y \
      nvidia-container-toolkit=${NVIDIA_CONTAINER_TOOLKIT_VERSION} \
      nvidia-container-toolkit-base=${NVIDIA_CONTAINER_TOOLKIT_VERSION} \
      libnvidia-container-tools=${NVIDIA_CONTAINER_TOOLKIT_VERSION} \
      libnvidia-container1=${NVIDIA_CONTAINER_TOOLKIT_VERSION}
As the container runtime gets installed with K3s, it is not possible to check this component's installation yet.
Installing K3s and joining a cluster
Instructions are provided here. The GPU node will be an agent and we can use the following for instance:
curl -sfL https://get.k3s.io | \
  sh -s - agent -s https://cluster-api-server:6443 --token-file /path/to/secrets/k3s_token \
    --node-taint nvidia.com/gpu=true:NoSchedule
This will also install a container run-time on the node, by default K3s uses containerd.
apt-get install kubernetes-client
A note about the node's taint key name
Tainting the GPU node with an arbitrary key name will prevent the required NVIDIA Kubernetes components to be scheduled on the node.
This is not explicitely documented, but reviewing the Helm chart's default values
gpu-operator/deployments/gpu-operator/values.yaml,
we can find this has to be nvidia.com/gpu=true:NoSchedule.
daemonsets:
  # ...
  tolerations:
  - key: nvidia.com/gpu
    operator: Exists
    effect: NoSchedule
node-feature-discovery:
  # ...
  worker:
  # ...
    tolerations:
  # ...
    - key: nvidia.com/gpu
      operator: Exists
      effect: NoSchedule
Installing the k8s-device-plugin
This is the final step of the installation,
lastly using the
NVIDIA GPU Operator.
A Kubernetes operator is a kind of pattern to automatically deploy various resources in a cluster,
as a human operator would do step by step, thus the name.
This one relies on Helm to be deployed, among other options, so this can be run on any host having access the the cluster API.
Instructions are provided
here.
In the default case of K3s using containerd,
care must be taken to configure the Container Toolkit properly,
for instance:
helm repo add nvidia https://helm.ngc.nvidia.com/nvidia && \
helm repo update && \
helm install --wait --generate-name \
    -n gpu-operator --create-namespace \
    nvidia/gpu-operator \
    --version=v25.3.4 \
    --set driver.enabled=false \
    --set toolkit.enabled=false \
    --set toolkit.env[0].name=CONTAINERD_CONFIG \
    --set toolkit.env[0].value=/var/lib/rancher/k3s/agent/etc/containerd/config.toml \
    --set toolkit.env[1].name=CONTAINERD_SOCKET \
    --set toolkit.env[1].value=/run/k3s/containerd/containerd.sock
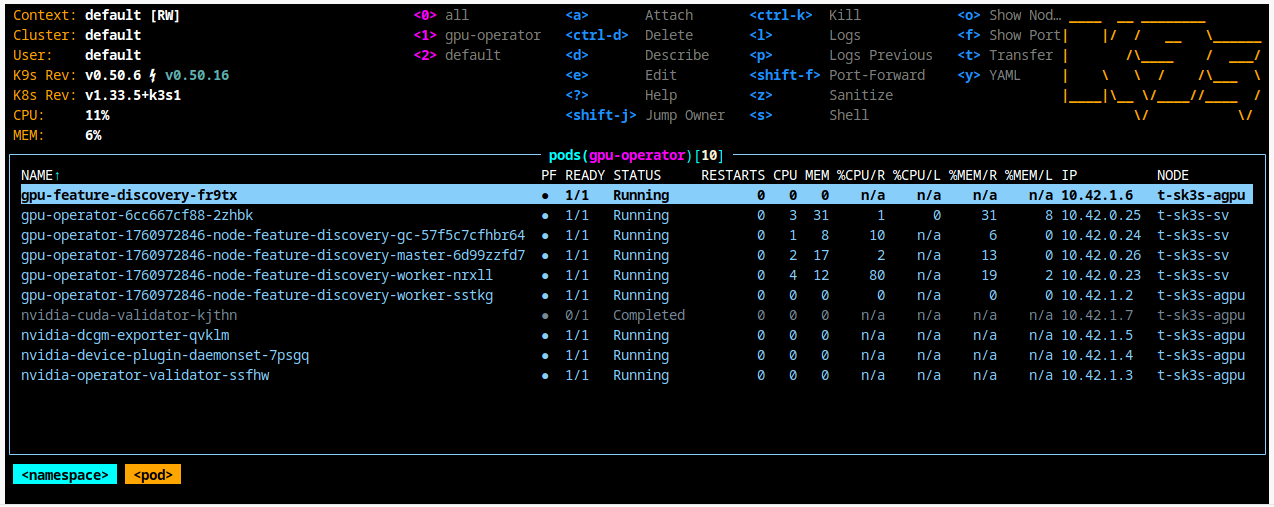
The operator achievements on the cluster can therefore be observed, for instance:

GPU workloads
A simple test workload enables to validate the installation:
apiVersion: v1
kind: Pod
metadata:
  name: cuda-vectoradd
spec:
  restartPolicy: OnFailure
  runtimeClassName: nvidia
  containers:
  - name: cuda-vectoradd
    image: "nvcr.io/nvidia/k8s/cuda-sample:vectoradd-cuda11.7.1-ubuntu20.04"
    resources:
      limits:
        nvidia.com/gpu: 1
  tolerations:
  - key: "nvidia.com/gpu"
    operator: Exists
    effect: "NoSchedule"
Which should log, depending on the hardware:
[Vector addition of 50000 elements[]
Copy input data from the host memory to the CUDA device
CUDA kernel launch with 196 blocks of 256 threads
Copy output data from the CUDA device to the host memory
Test PASSED
Done
What is important in this specification beyond resources and toleration
is to specify runtimeClassName: nvidia so that the NVIDIA container runtime
is involved when the container is initialized.
A development environment
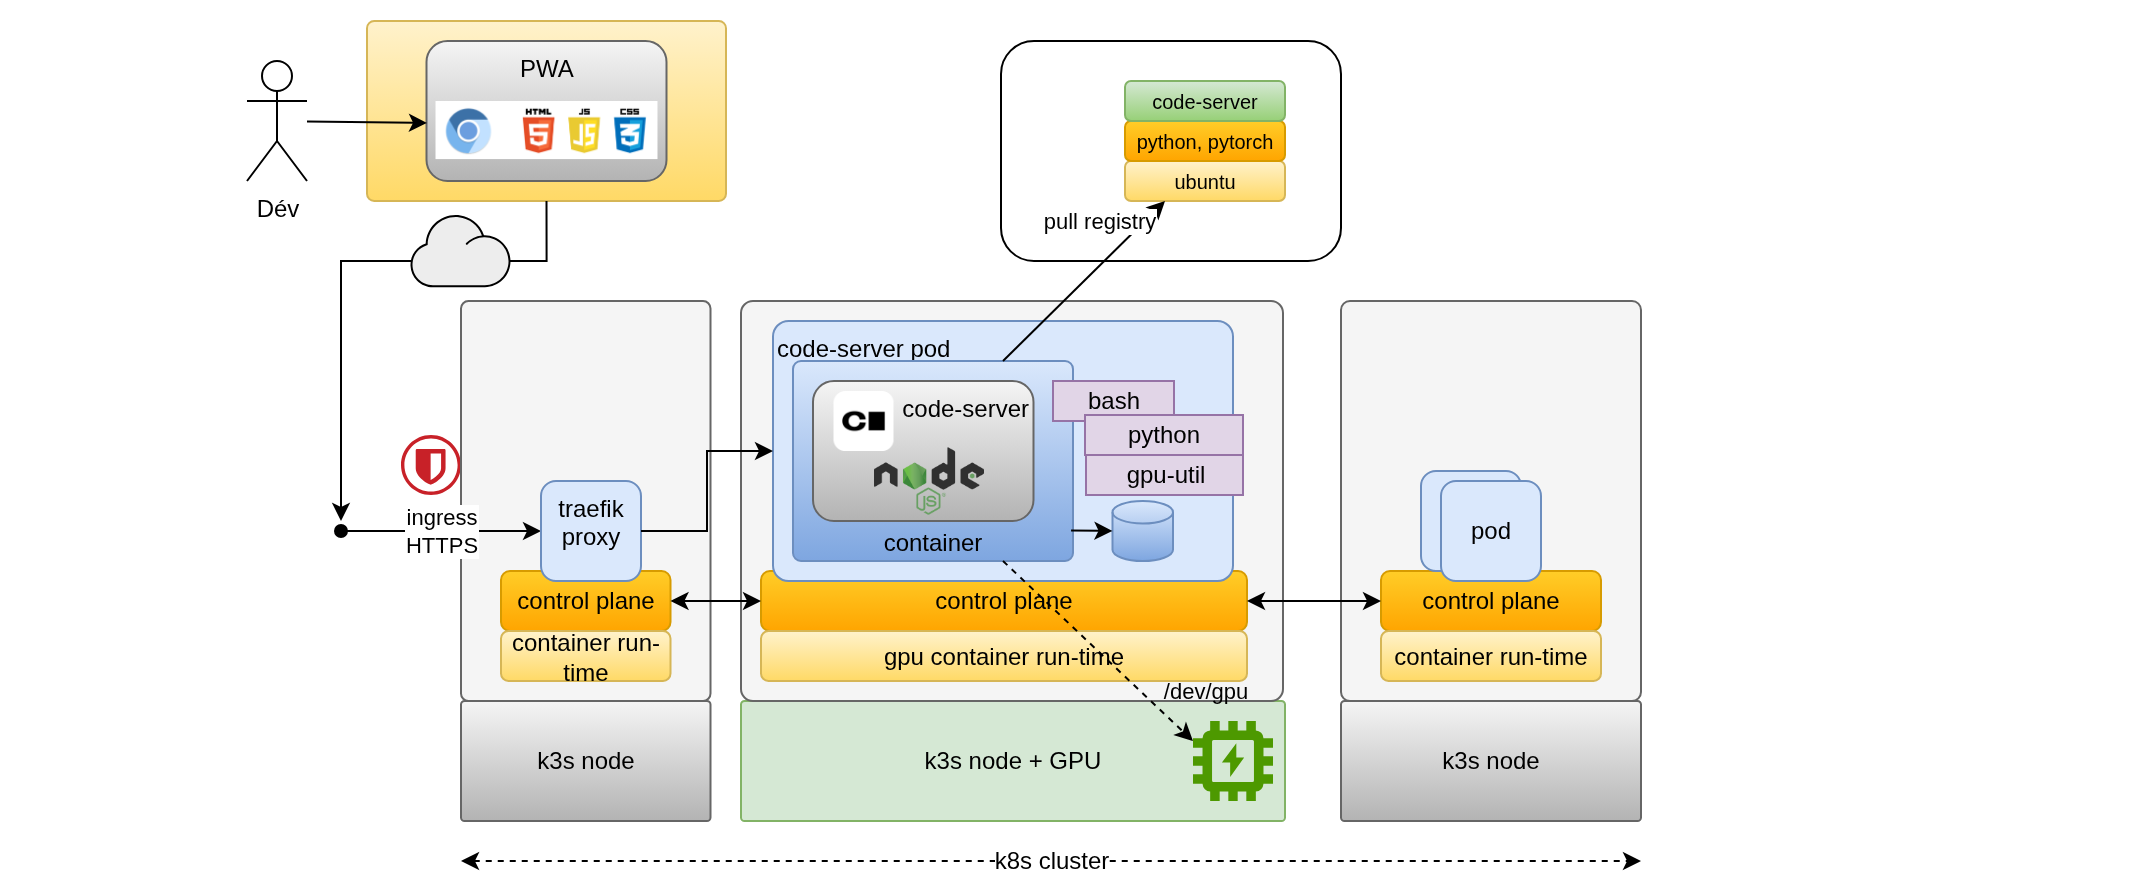
A full-featured pytorch-based development environment can easily be set up thanks to code-server that could be deployed following the figure:

The Dockerfile for the code-server container further extends pytorch's one, see the code directory in the repository for this blog here:
FROM pytorch/pytorch:2.9.0-cuda13.0-cudnn9-runtime

ARG CSV=4.105.1

RUN apt-get update \
  && apt-get install -y \
    curl \
    locales \
    openssh-client \
    rsync \
    procps \
    vim-tiny \
    bash-completion \
    git \
    python3 \
    python3-pip \
    virtualenv \
    make \
    dnsutils \
  && rm -rf /var/lib/apt/lists/*

# https://wiki.debian.org/Locale#Manually
RUN sed -i "s/# en_US.UTF-8/en_US.UTF-8/" /etc/locale.gen \
  && locale-gen

RUN mkdir -p /usr/local/lib /usr/local/bin /home/cs-user \
  && curl -fL https://github.com/krallin/tini/releases/download/v0.19.0/tini-amd64 -o /usr/local/bin/tini \
  && chmod +x /usr/local/bin/tini \
  && adduser --gecos '' --disabled-password --uid 2001 --shell /bin/bash cs-user \
  && curl -fL https://github.com/coder/code-server/releases/download/v$CSV/code-server-$CSV-linux-amd64.tar.gz \
  | tar -C /usr/local/lib -xz \
  && mv /usr/local/lib/code-server-$CSV-linux-amd64 /usr/local/lib/code-server-$CSV \
  && ln -s /usr/local/lib/code-server-$CSV/bin/code-server /usr/local/bin/code-server
COPY entrypoint.sh /usr/local/bin/

EXPOSE 8443

USER 2001
ENV LANG=en_US.UTF-8
ENV USER=cs-user
ENV HOME=/home/cs-user
ENTRYPOINT ["/usr/local/bin/tini", "--", "/usr/local/bin/entrypoint.sh"]
Be warned, you will get a 6GB image as a result. Yes Data Science infrastructure doesn't come for free.
When integrating the image in a Pod, don't forget to set the runtimeClassName.
apiVersion: v1
kind: Pod
#...
spec:
  #...
  runtimeClassName: nvidia
  containers:
    #...
Conclusion
Using cloud-native technology for Data Science not only enables a more economic use of available resources, but also leads to a more standard way to package and deploy workloads, even giving access to remote development as illustrated just above.
The documentation is not so easy to read in the case of NVIDIA, but the operator does a great work and is in the end the simplest component to deploy.
References
Kubernetes:
NVIDIA Cloud Native Technologies:
- NVIDIA Container Toolkit
- Architecture overview
- NVIDIA Device Plugin for Kubernetes
- NVIDIA GPU Operator
- NVIDIA GPU Feature Discovery
And also:

