From Kubernetes manifests to helm charts
Published on 2024/02/16
Introduction
Purpose
As stated in its documentation, Helm is the package manager for Kubernetes. Many users of Kubernetes clusters know it for its ability to install and upgrade third-party products.
This article is for those who don't already know Helm, at least not from a Helm chart developer point of view. It is an incentive to adopt it easily and to get related benefits quickly, beyond its mere usage for installing third-party products.
Once this first goal is achieved, Helm appears more like a must-use, and progressing with confidence in its knowledge is easier.
The article is based on a simple deployment provided as an example in the following git repository.
Useful links are provided at the bottom of this page.
Presentation
Before diving in the use of Helm, it may be worth having a short presentation.
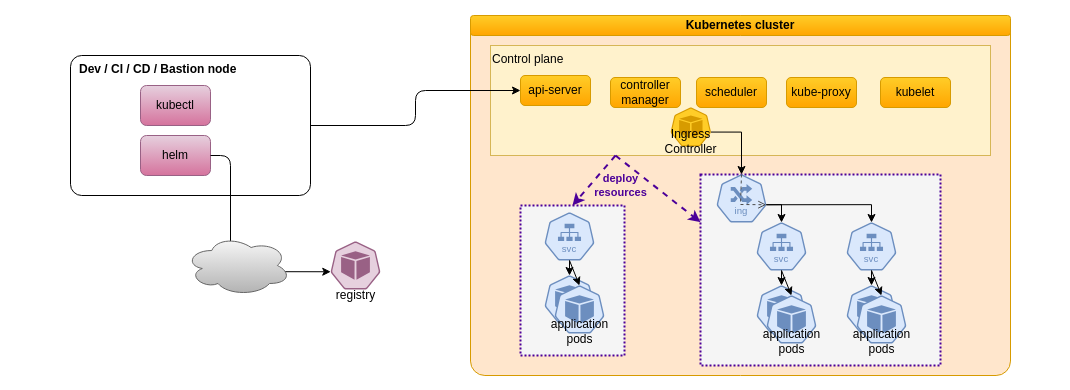
Helm integrates with the Kubernetes cluster the same way kubectl does, using the kubernetes API. From an operational point of view it can be used therefore in the same kind of environments, sharing the same config files to access the control plane.
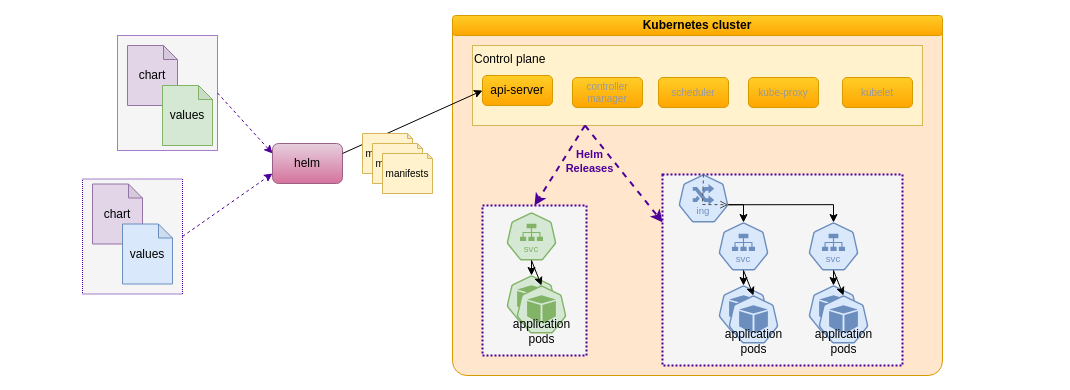
Helm also integrates with registries that are similar to Docker image registries, but in that case those registries support the delivery of Helm packages instead of Docker images. Helm uses a delivery package format named Helm chart: Helm charts can be downloaded from registries, but also directly accessed as local files, which is necessary during the development and testing phase. This is what will be demonstrated in this article.

Deploying a package on Kubernetes has differences with deploying a package on an Operating System: in both cases, programs and data must be downloaded, installed and configured, and later upgraded for maintenance. However, just because the purpose of Kubernetes is to orchestrate many containers, several instances of a given package must be installable and run at the same time.
For instance, a Helm package for a Web Server may be installed several times with distinct configurations and Web resources each time. A deployed instance of a chart is called a Release. The configuration that is specific to a Release, like the server name of a Web server, is provided to Helm using values. The status of each Release, including those values, is recorded by Helm.

Technically, Helm uses the Kubernetes API with the well-known yaml manifest format for the various resources deployed during a Release installation. We can thus leverage our knowledge of Kubernetes resources and their configuration.
Let's start designing simple Helm charts for deploying basic workloads.
Step zero, install Helm
As mentioned above, Helm uses the same API than kubectl, so it can be installed in the same environment. Also note that kubectl installation is a prerequisite.
Apart from that, the installation is straightforward: as for many other Go-based tools,
the simplest way is to download the stable release from the
github
repository and to install the helm binary somewhere in the PATH.
Then we may want to check that the installation is correct. On a K3s cluster (see this for instance) using the standard Traefik ingress controller, we can list what Helm was told to install during K3s installation:
$ helm list -A
NAME        NAMESPACE   REVISION    UPDATED                                 STATUS      CHART                       APP VERSION
traefik     kube-system 9           2024-02-10 13:33:30.933055969 +0000 UTC deployed    traefik-25.0.2+up25.0.0     v2.10.5
traefik-crd kube-system 1           2024-01-18 16:29:48.130052598 +0000 UTC deployed    traefik-crd-25.0.2+up25.0.0 v2.10.5
It's now time to create a first Helm chart.
First step, Helm chart from existing manifests
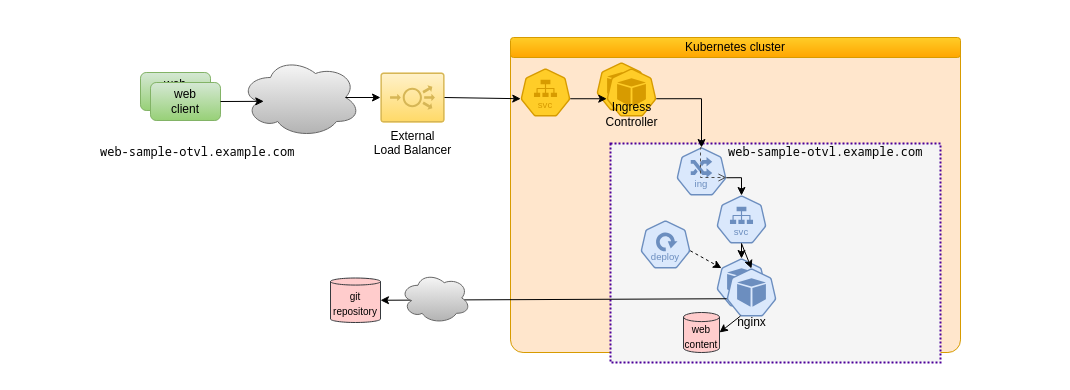
Without Helm, we deploy Kubernetes resources by applying manifests files, such as provided as an example here. This one would deploy the resources colored in blue on the following diagram:

The following Kubernetes resources are deployed:
- a Deployment, requesting two replicas of Pods
- those Pods are nginx Web servers, using web resources from a git repository
- the git repository is cloned at installation time by an init container running a git image
- a Service for accessing the Pods
- an Ingress for exposing the Service on an External Load Balancer with a Let's Encrypt certificate (for explanations on the last point see for instance a previous article)
Developing a Helm chart that does the same is straightforward and is provided here. The simplest way to get started for such a task is:
- perform
helm create web-sample-otvl - in the generared directory, remove files in
templates, adapt content inChart.yaml, remove entries invalues.yaml - in the
templatesdirectory, create filesdeployment.yaml,service.yamlandingress.yamlwith the same content as the corresponding yaml sections in the manifest file above
Here we have our first installable Helm chart.
To install the application, check its behavior, and finally uninstall it:
# provide a Release name and the path to the Chart local directory
$ helm install web-sample-otvl code/k8s-manifests-to-helm-steps/step1/web-sample-otvl
NAME: web-sample-otvl
LAST DEPLOYED: Sun Feb 11 13:39:46 2024
NAMESPACE: default
STATUS: deployed
REVISION: 1
TEST SUITE: None

# check what was deployed
$ kubectl get deploy
NAME              READY   UP-TO-DATE   AVAILABLE   AGE
web-sample-otvl   2/2     2            2           9m40s
# retrieve the manifest information aggregated from files in the templates directory
$ helm get manifest web-sample-otvl
...

# final clean-up
$ helm uninstall web-sample-otvl
release "web-sample-otvl" uninstalled
$ kubectl get deploy
No resources found in default namespace.
This first step illustrates the following:
- existing manifests can be easily leveraged to work with Helm
- manifest files can be split into distinct chart files according to their resources types, making the charts easier to understand
- deployed Releases keep the history of the manifests used to deploy the corresponding resources
- deployed resources for a Release can be uninstalled directly
Second step, resources named from the Helm Release
This first chart works basically, however deploying a second instance fails as resources names are hard-coded.
$ helm install web-sample-otvl code/k8s-manifests-to-helm-steps/step1/web-sample-otvl
...
$ helm install web-sample-otvl-twice code/k8s-manifests-to-helm-steps/step1/web-sample-otvl
Error: INSTALLATION FAILED: Unable to continue with install: Service "web-sample-otvl" in namespace "default" exists and cannot be imported into the current release: invalid ownership metadata; annotation validation error: key "meta.helm.sh/release-name" must equal "web-sample-otvl-twice": current value is "web-sample-otvl"
A simple solution to this obvious issue is to make the Helm Chart configurable with
the name of the Helm release.
This is also straightforward because Helm uses a template language to generate the Kubernetes manifests.
We simply have to change the string web-sample-otvl with the template syntax: {{ .Release.Name }} every time it
appears in the Chart templates, such as in deployment.yaml:
apiVersion: apps/v1
kind: Deployment
metadata:
  name: {{ .Release.Name }}
  # etc
Now we can verify it works as intended:
$ helm install web-sample-otvl code/k8s-manifests-to-helm-steps/step2/web-sample-otvl
...
$ helm install web-sample-otvl-twice code/k8s-manifests-to-helm-steps/step2/web-sample-otvl
...
$ helm list
NAME                    NAMESPACE   REVISION    UPDATED                                 STATUS      CHART                   APP VERSION
web-sample-otvl         default     1           2024-02-11 14:37:14.999198508 +0100 CET deployed    web-sample-otvl-0.1.0   1.0
web-sample-otvl-twice   default     1           2024-02-11 14:37:21.046401966 +0100 CET deployed    web-sample-otvl-0.1.0   1.0
$ kubectl get deploy
NAME                    READY   UP-TO-DATE   AVAILABLE   AGE
web-sample-otvl         2/2     2            2           104s
web-sample-otvl-twice   2/2     2            2           52s
$ helm uninstall web-sample-otvl web-sample-otvl-twice
This second step illustrates the fundamental ability of Helm to make deployments configurable. Retrieve the used Chart here.
Third step, all relevant items made configurable
This second version of the Chart works well, however all resources properties but their names remain hard-coded. It is fine because it works out-of-the-box, anyway we can easily set some default values for configurable items in a yaml file, and leverage this file from templates. We will see after that how this way of configuring deployments may be used.
Using configurable values
Here is a values.yaml file for our chart:
replicaCount: 2
images:
  nginx: nginxinc/nginx-unprivileged:1.25.3
  git: bitnami/git:2.43.1
  busybox: busybox:1.36.1
git_repo:
  url: https://github.com/t-beigbeder/otvl_blog
  branch: master
resources:
  requests:
    cpu: "0.25"
    memory: 128Mi
  limits:
    cpu: "1"
    memory: 512Mi
ingress:
  enabled: true
  # host: web-sample-otvl.example.com, defaults to <release-name>.example.com
The third version of the Chart can use those values with the now familiar template syntax.
For instance let's have a look at the deployment.yaml template:
apiVersion: apps/v1
kind: Deployment
# ...
spec:
  # ...
  replicas: {{ .Values.replicaCount }}
  template:
    # ...
    spec:
      # ...
      containers:
        - name: web-server
          image: {{ .Values.images.nginx }}
          resources:
            {{- toYaml .Values.resources | nindent 12 }}
      # ...
      initContainers:
        - name: git-installer
          image: {{ .Values.images.git }}
          command: ["git", "clone", "--single-branch", "--branch", {{ .Values.git_repo.branch | quote }}, "--", {{ .Values.git_repo.url | quote }}, "/workdir/clone"]
      # ...
The .Values.resources used to configure the nginx web-server container resources field is interesting, because we see how a composite yaml structure in the values.yaml file can be easily inserted in a manifest file. This helps having a values.yaml file that remains readable for Kubernetes users.
Let's check it works without installing, using the dry-run flag:
# check the manifest rendering with default values from the templates
$ helm install wso code/k8s-manifests-to-helm-steps/step3/web-sample-otvl --dry-run
...
The file values.yaml is part of the package and must not be modified: it contains the default values for our Chart.
Overriding default values for different deployments
Using the same syntax, we can create a values file intended to override the item resource default values that we want to configure at deployment time. For instance, using the values1.yaml file:
ingress:
  host: web-sample-otvl.example.com
and a similar values2.yaml,
ingress:
  host: web-sample-otvl-twice.example.com
We can deploy two Helm releases of our Web application with their specific DNS server names.
# override default values for the ingress
$ helm install wso code/k8s-manifests-to-helm-steps/step3/web-sample-otvl --values code/k8s-manifests-to-helm-steps/step3/values1.yaml
...
$ kubectl get ingress wso
NAME   CLASS     HOSTS                         ADDRESS          PORTS     AGE
wso    traefik   web-sample-otvl.example.com   192.168.122.48   80, 443   26s

# override default values for the ingress
$ helm install wso2 code/k8s-manifests-to-helm-steps/step3/web-sample-otvl --values code/k8s-manifests-to-helm-steps/step3/values2.yaml
...
$ kubectl get ingress wso2
NAME   CLASS     HOSTS                               ADDRESS          PORTS     AGE
wso2   traefik   web-sample-otvl-twice.example.com   192.168.122.48   80, 443   12s
Overridden values are not just specific to a Release installation, they may also be changed to perform a Release upgrade.
Changing values for an upgrade
As a final step, let's try to achieve an upgrade: modifying an existing Release configuration, using the values file value2b.yaml:
ingress:
  enabled: false
This inform the template generator to skip the generation of the Ingress resource, as the corresponding template contains:
# file ingress.yaml
{{- if .Values.ingress.enabled -}}
apiVersion: networking.k8s.io/v1
kind: Ingress
# etc.
{{- end }}
Upgrading the second Release will delete the Ingress that is not wanted anymore, but keep all other resources intact:
$ helm upgrade wso2 code/k8s-manifests-to-helm-steps/step3/web-sample-otvl --values code/k8s-manifests-to-helm-steps/step3/values2b.yaml
...
$ helm history wso2
REVISION    UPDATED                     STATUS      CHART                   APP VERSION DESCRIPTION
1           Sun Feb 11 19:43:11 2024    superseded  web-sample-otvl-0.1.0   1.0         Install complete
2           Sun Feb 11 19:44:35 2024    deployed    web-sample-otvl-0.1.0   1.0         Upgrade complete
$ kubectl get pods
NAME                        READY   STATUS      RESTARTS       AGE
wso-787c68cc68-tvzxt        1/1     Running     0              106s
wso-787c68cc68-5dnzm        1/1     Running     0              106s
wso2-6dd8976b5d-qxlvp       1/1     Running     0              98s
wso2-6dd8976b5d-n92gs       1/1     Running     0              98s
$ kubectl get ing
NAME                        CLASS     HOSTS                         ADDRESS          PORTS     AGE
wso                         traefik   web-sample-otvl.example.com   192.168.122.48   80, 443   2m8s
If we change our mind about the upgrade:
$ helm rollback wso2
Rollback was a success! Happy Helming!
$ kubectl get ing
NAME                        CLASS     HOSTS                               ADDRESS          PORTS     AGE
wso                         traefik   web-sample-otvl.example.com         192.168.122.48   80, 443   21m
wso2                        traefik   web-sample-otvl-twice.example.com   192.168.122.48   80, 443   8s
Great! we are the witnesses of an Ingress second coming. However, be warned that only a single rollback is possible.
Configured releases
This third and final step illustrates the following:
- existing manifests can easily be made configurable
- as we can see, upgrading a Release potentially can have a lot of consequences and must be done with caution
- upgrading the configuration for a Release requires that we keep the previous configuration and just change the required items, as a consequence the values files must be versioned with care, this is not specific to the use of Helm
Releases upgrades can have different origins:
- the Chart has changed, for instance if new components are added or deployed differently: Helm provides a versioning scheme for Charts based on semantic versioning
- the Chart as a whole also includes its default values, which can change, for instance deploying a new component version by changing the container's image version
- the overriding values provided with the upgrade are different than those used previously
As briefly seen, Helm upgrades take care to modify resources impacted by any of those changes, and only them, and only their changed attributes.
Retrieve the used Chart and values files here.
Next steps
In a few steps we have come to a really pleasant way of deploying Kubernetes workloads.
The first thing required for going further is to get a good knowledge of Helm's template language and specifically its functions.
It is also important to define as soon as possible a way of keeping track of Releases and versions: while Helm tracks what is deployed, we must ensure that Charts and values used for each deployment are correctly versioned for instance using Git. As with other deployment automation tools like Ansible and Terraform, a frequent way of working is to keep the configured values in a separate space. Managing secrets can be challenging.
Conclusion
First benefits
When we deploy even a trivial application in several environments, chances are that a few configured items will have to be tuned. This short example shows that Helm is rather easy to leverage in a straightforward manner, still providing a lot of desirable outcomes, including:
- the use of a kind of standard shared by many Kubernetes users, coming with its own set of good practices
- more control on the resulting deployments and their upgrades or uninstallation
- the ability to control even low-level configured items, making successive deployments more predictable
- keeping the scope of upgrades limited to what is actually changed
Note: for simple cases, kustomize may be considered as well.
Going further with confidence
Of course, many deployments require much more complex mechanisms to succeed, for instance:
- deploying complex or large workloads involving many services, such as clusters for data management or data processing with failure zone management,
- controlling the details of which resources have to be restarted,
- ensuring reliable operations for people who don't know how our chart is designed,
- enforcing enterprise security or other technical patterns efficiently at deployment time.
First it must be highlighted that the scope of Helm is restricted to the application, update and removal of Kubernetes resources. What happens after it is done is the responsibility of the workloads involved in the deployment. For complex use cases, the use of Kubernetes operators for instance should be considered.
Anyway Helm is also the tool for such situations:
- Helm charts are composable through the use of dependencies, which are sub-charts that may be local or references to a shared repository
- Helm templates enable the definition and application of "partials" which are some kinds of reusable template snippets
- Helm enables to apply various checks on input values
- Helm provides a hook mechanism allowing for specific deployment workflows
- Helm comes with a plugin mechanism enabling among others the integration of external infrastructure such as vaults
Helm is supported by and built with a community of over 400 developers. Thanks to each of them.
References and further information
- Helm documentation, the definitive reference, very clear and easy to understand, but not so easy to parse at the beginning
- The book Learning Helm by Matt Butcher, Matt Farina, Josh Dolitsky, maintainers of Helm
- Kubernetes Operators and Helm — It takes Two to Tango
- How to Handle Secrets in Helm
And also (other machines):

